How To Draw A Collared Shirt In Just Five Steps
Once you learn how to draw a collared shirt, the possibilities are endless.
You can use this skill for fashion sketches, illustrations, or even just as a handy reference for when you need to dress up your wardrobe.
With some practice, you’ll be able to create any type of collared shirt that you desire.
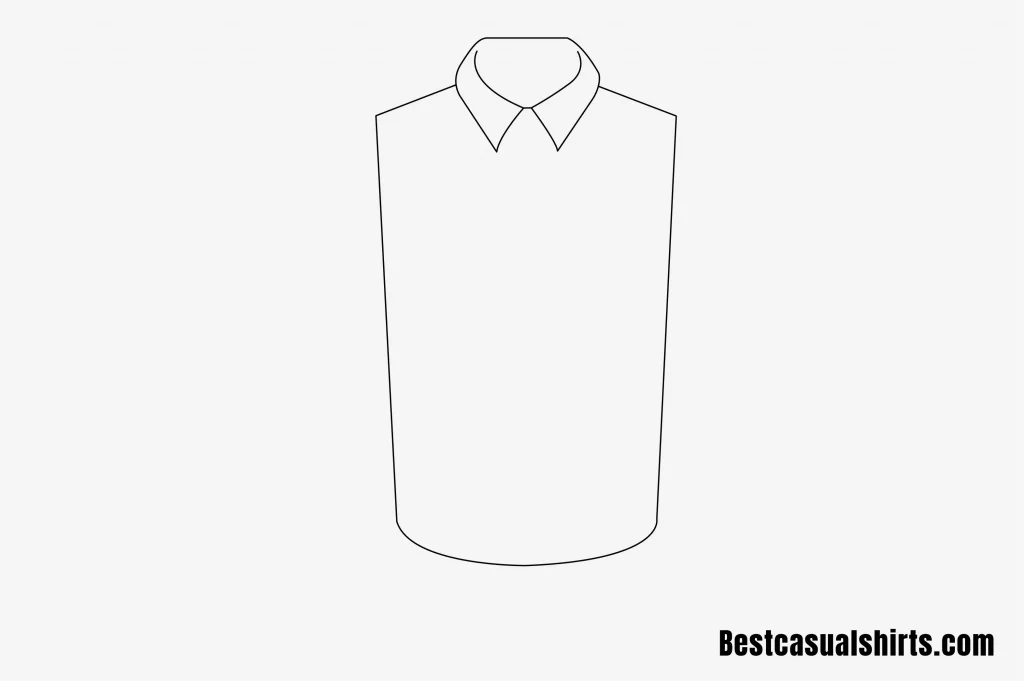
Step 1 – Draw A Collar
The collar is an important element of how the shirt will look and it is important to get the sizing and fit right.
There are different types of collars that can be used for shirts including the polo collar, turtleneck collar, and sweater collar.
It is important to choose the right type of collar for the shirt you are trying to create.
Let’s take a look at how it’s done step by step:

- Start with an outline of the top.
- Following the sides, draw the lower part of the inner outline and the upper part.
- Connect the two sides of the collar with a short line as well.
- Make sure the collar is an oblong shape and symmetrical on both sides.
Step 2 – Draw Shirt’s Vest

- After the collar, add the shoulders, sides, and bottom of the main part of the shirt.
- When done, it should look like a vest.
Step 3 – Draw Sleeves And Cuffs

- Make a pair of sleeves that come out of each side of the “vest.”
- Put a cuff at the bottom of each sleeve.
- Cuffs should be short and slightly narrower than sleeves.
Step 4 – Draw Buttons And Finish Lines

- Draw three or two horizontal lines for where the buttons are going to be placed. Draw lines about 3/4 of an inch apart from each other across the entire collar area.
- Where buttonholes will be placed, draw vertical lines. If you’ll need five buttonholes, the top line should encompass them all; if you’ll simply need one or two, the bottom line should encompass them all.
- You can then add a series of buttons going through the middle of these lines.
- Last but not least, trace over all the lines of your drawing with either a thin black pen or a black marker.
Step 5 – Put Some Shades For A Nice Look

If you want to color the shirt, you can pretty much do whatever you want.
The inner bottom of the collar usually has a shadow on it, so you could add a darker gradient there.
If you have a lighter-colored shirt, colored pencils might work.
You can also add a shadow gradient around the collar pretty easily.
Tips For Drawing A Collared Shirts
It’s a fun activity to do if you’re looking for a project. It isn’t particularly time-consuming,
And the final product seems to be more intimate.
When drawing the shirt, the collar and buttons must both be taken into consideration.
Drawing a shirt collar is simple.
Make sure that these parts are in proportion to each other when you sketch them, otherwise,
They will appear out of proportion in your finished work of art.
It will appear strange in your collared shirt, for example,
If you draw a collar that is twice as broad as the buttons.
Drawing the shirt’s fabric is the next step, and it is crucial because it will provide texture for your artwork.

The following tips:
- Begin by drawing a rough outline of your shirt. The collar, sleeve, and hemline of your shirt are often in this form.
- For your buttons, pockets, seams, and cuffs, add in a few basic shapes.
- To achieve that realistic effect, you can use different fabric textures!
After completing that drawing on paper, you may transfer it to a collared shirt template.
How To Draw A Polo Shirt?

Once you have the basic outline of the polo shirt, you can then begin to add the details.
The following tips can help you with this:
- Show the front placket with the two long lines. The buttons will be placed on this portion of the shirt.
- Next, draw the polo shirt collar. It might have a distinct appeal, similar to that shown by the Easydrawingart.com artists in the example.
- Show the sleeves and how they are fitted. The top section of the sleeves should be curved, and the bottom should be fitted.
- To represent the front placket, use the two long lines. The buttons will be placed on this section of the shirt.
- The lower part of the sleeves should be cuffed.
- Finally, remove all your sketch guidelines with an eraser and trace your work with a dark pencil or ink.
How Do You Draw A Cartoon Collared Shirt?

There is no one definitive way to draw a cartoon collared shirt,
As the style will depend on the artist’s individual preferences and style.
However, some tips that may help include accurately depicting the proportions of the body, capturing the wrinkles and folds in the fabric, and rendering the buttons and seams accurately.
Additionally, it is important to make sure that the lines are smooth and free from choppiness,
As this can detract from the overall quality of the drawing.
How Do You Draw A Fashionable Shirt?

There is no one right way to draw a fashionable shirt,
As everybody is different.
However, there are a few tips that can help you to draw a shirt that is flattering and stylish.
The first step is to study the shape of your body, and sketch out a rough outline of your torso using basic shapes like ovals and circles.
Next, add in your arms and shoulders and determine their proportions.
Finally, add in the details like the neckline, sleeves, and waistline.
When it comes to color, choose shades that compliment your skin tone.
For example, if you have olive skin, go for shades like brown or green.
If you have light skin, go for shades like yellow or white.
And if you have dark skin, go for shades like black or navy blue.
Be sure to experiment with different colors and styles to see what works best for you!
Read this guide on the most popular colors on trend to help you to experiment with different colors.
Bottom Line
By following the simple steps outlined in this guide,
You will be able to draw a collared shirt, Polo shirt, men’s shirt, and cartoon shirt that looks great and accurately represents the features of the garment.
Whether you are an experienced artist or just starting out,
We hope you find this tutorial helpful and easy to follow.
Have fun with it and feel free to experiment with different techniques and colors!
Frequently Asked Questions
What kind of pattern is best for drawing a collared shirt?
There is no one right answer to this question, as everyone has their own style. However, a common pattern that can be used to draw a collared shirt is the V-neck. This pattern can be easily created by starting at the neckline and drawing a curve outward. Then, follow the curve down to the bottom of the shirt, and draw a straight line from there to the bottom of the shirt.
How do you draw a man’s shirt?
Men usually wear shirts with collars and buttons, which are different from the V-neck type of shirt worn by women. To draw a man’s casual shirt that has these details, use the shape and proportions you’ve learned above when drawing an outline for your character. Then add in his shoulders, neckline, sleeves, and waist before filling it in with pencils or ink. That’s all! Now you know how to draw a man’s shirt.
How do you draw a man’s t-shirt?
T-shirts are also worn by men, but they look very different than V-necks and button-down shirts with collars and cuffs. To draw a man’s casual t-shirt that is unbuttoned all the way to his chest level, use the previous methods of outline drawing when sketching out your character before adding in details such as sleeves or collars.
How do you draw a collared jacket?
If a man is wearing another kind of formal or semi-formal jacket, he will usually wear it buttoned all the way up. Otherwise, if he’s going for casual style with open collars and half sleeves, you can make his look more trendy by drawing an outline as usual before adding creases along the arms to give them that wrinkled appearance.
How do you draw a turtleneck?
If your character is wearing a leather triple triangular vest, use either method from the above-provided instructions for coming up with that rough outline before sketching in details such as a collar or shirt stitching inside and out on his chest. After creating this basic shape at first, use the body shapes and lines of your outline to help you determine what other clothing details he should have where.

![What Color Pants With Black Shirt – Style Guide [2024]](https://bestcasualshirts.com/wp-content/uploads/2023/12/What-Color-Pants-With-Black-Shirt-450x254.png)


